Pulse jet dust collectors depend on diaphragm valves to deliver short, strong bursts of compressed air that knock dust off filter bags and cartridges. When a diaphragm wears out, cleaning suffers, pressure drop rises, and compressed air leaks away. Diaphragm repair kits are an inexpensive fix when you catch the problem early and order the correct kit. This guide covers the warning signs, how to identify your valve and kit, and general maintenance practices.
How a Pulse Valve Works
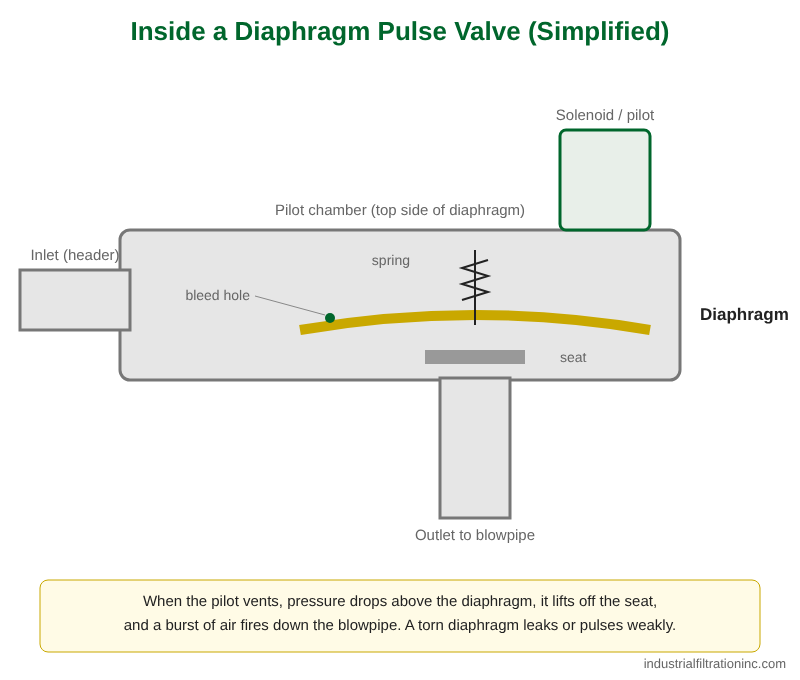
A pulse valve sits between the compressed air header and the blowpipe. A flexible diaphragm holds the valve closed by balancing air pressure on both sides. When the controller energizes the solenoid pilot, air bleeds from behind the diaphragm, the diaphragm lifts, and a burst of air travels down the blowpipe into the filters. When the pilot closes, pressure rebuilds behind the diaphragm and the valve snaps shut.
Because this cycle repeats many times a day, the diaphragm flexes constantly. Over time the rubber hardens, cracks, tears, or loses its seal, and the small bleed hole in the diaphragm can clog. Springs can also weaken or break.
Symptoms of a Failed Diaphragm
| Symptom | Common causes |
|---|---|
| Continuous air leak through the blowpipe | Torn or cracked diaphragm, debris on the valve seat, broken spring, or a pilot or solenoid that is stuck open |
| Weak or “soft” pulse | Hardened or worn diaphragm, low header pressure, a partially clogged bleed hole, or a restriction in the pilot line |
| Valve stuck open | Ruptured diaphragm, blocked bleed hole, debris holding the diaphragm off the seat, or a failed solenoid |
| Valve stuck closed / no pulse | Failed solenoid or coil, no signal from the controller, plugged pilot exhaust, or a diaphragm swollen or stuck to the body |
| Header will not hold pressure | One or more valves leaking, often a damaged diaphragm |
| Rising differential pressure across the filters | Ineffective cleaning from weak or non-firing valves, among other possible causes |
A quick way to locate a problem is to listen at each valve during a cleaning cycle with the collector running. Every valve should fire with a crisp, consistent pulse. A valve that hisses between pulses, sounds muffled, or never fires needs attention. Remember that not every symptom is a diaphragm: check the solenoid, controller output, and air supply before you take the valve apart.
Safety First: Lock Out and Depressurize
Pulse valves hold stored compressed air energy. Before servicing any valve:
- Follow your facility’s lockout/tagout procedure for both electrical and pneumatic energy.
- Shut off the compressed air supply to the header and lock the isolation valve.
- Drain the header completely and verify zero pressure with a gauge before loosening any bonnet screws.
- De-energize the controller and solenoids.
- Wear eye protection and follow your plant’s PPE and confined space rules if you need to enter the collector.
Never open a valve bonnet on a pressurized header. The cover and spring are under load.
Valve Sizes, Families, and Repair Kits
Repair kits are specific to the valve manufacturer, valve series, and size. A kit for one brand’s 1-inch valve generally will not fit another brand’s 1-inch valve, and even within one manufacturer, different series of the same size can use different diaphragms.
Size
Pulse valves are commonly sized by port, with typical sizes ranging from about 3/4 inch to 3 inches. Larger valves deliver more air per pulse and are used on larger filters or longer blowpipes.
Single vs. double diaphragm
Smaller valves often use a single diaphragm. Many larger valves use a double-diaphragm design, with a main diaphragm and a smaller pilot diaphragm, to open quickly. Kits for double-diaphragm valves typically include both diaphragms and their springs, and both should be replaced together.
Body style
- Right-angle (threaded): inlet and outlet at 90 degrees; the most common style on many collectors.
- Dresser nut or compression fitting: connects to pipe without threading.
- Immersion or tank-mounted: mounted directly on the air manifold for a fast, high-flow pulse.
- Integral pilot vs. remote pilot: the solenoid may be mounted on the valve or in a separate enclosure connected by tubing.
Diaphragm material
Standard diaphragms are commonly nitrile (Buna-N). For higher temperatures or certain chemical exposure, fluoroelastomer (FKM) diaphragms are available for many valves. Use the material that matches your operating conditions.
Reading the Valve Tag
Most pulse valves have identifying information cast into the body or bonnet, printed on a label, or stamped on a tag. Look for:
- Manufacturer name or logo
- Model or series number, which usually encodes the size and style
- Port size
- Coil voltage and type, if the solenoid is integral
- Diaphragm material code, on some models
If the tag is painted over or worn, clean it gently or check the collector manual, original drawings, or spare parts list. Photos of the valve from several angles, along with the port size and the bolt pattern on the bonnet, can help identify an unmarked valve. Also note the number of bonnet screws and whether there is one diaphragm or two inside when you open it.
Preventive Maintenance Guidance
Diaphragm life depends on cleaning frequency, air quality, header pressure, and temperature. Rather than waiting for failures, many plants follow practices like these:
- Listen to every valve during routine rounds and log any that sound weak or leak.
- Inspect diaphragms during scheduled shutdowns, and follow the valve manufacturer’s recommended replacement interval where one is published.
- Replace all diaphragms in a collector at the same time once several have failed, since the others are often near the end of their life too.
- Keep compressed air clean and dry. Drain the header and use dryers and filters, because water, oil, and scale shorten diaphragm life and clog bleed holes.
- Run header pressure within the collector manufacturer’s specified range; excessive pressure stresses diaphragms and filters.
- Keep a few repair kits for each valve size on the shelf so a single failure does not take a collector offline.
After rebuilding, inspect the seat for nicks or debris, make sure the bleed hole is clear, and assemble the diaphragm in the correct orientation. Tighten bonnet screws evenly in a cross pattern, then repressurize and verify each valve fires cleanly and seals between pulses.
Get the Right Kit the First Time
Industrial Filtration supplies pulse valves and diaphragm repair kits along with dust collector filters. If you have a valve tag, a model number, or just photos, call us at 562-436-4228 or email info@industrialfiltrationinc.com. We will help you match the correct kit or replacement valve.
